
Sarah Amalia she/her
she/her
Technical Writer | Markdown Expertise
West Java, ID
West Java, ID
Hi, I’m Sarah,
a passionate Technical Writer with a strong English background and a genuine curiosity for technology. I bring both technical understanding and strong language instincts to every documentation I write.
onsite | Kulon Progo - YK, ID
Internship
several web I found tempting last night
Feb 28, 2026
Read the docs like a book
2026
you are always doing something wrong
2026
Rumination
2025
How I Use Claude and NotebookLM to Accelerate My Learning
Nov 4, 2025
2026
A simple and easy-to-understand guide for writers and beginners in Markdown.
2026
A quick reference guide and cheatsheet for Git and GitHub.
TIP
This following cheat sheet assumes that you:
Terminal (Window)
The terminal is the interface where you type commands as text input and receive output. It is the window you use to communicate with the computer’s operating system.
Command Line Interface(CLI)
CLI is a method/concept of controlling your computer by typing text command into the terminal window.
Shell
Shell is the command line interpreter. It is a program that reads the commands, interprets them, and executes them, and return with the output reusults. It acts as the translator between you and your computer system.
Paths:
/: root directory
~: home directory
.: current directory
..: parent directory
| Command | Acronym/Stand for | Action | Quick Tip |
|---|---|---|---|
cd <folder> | Change Directory | Move into specified folder. | Run this when you need to navigate into a directory. |
cd .. | Change directory (up) | Moves back one level to the parent directory. | Run this to backtrack without returning to home. |
cd ~ | Change Directory (Home) | Naivgates directly to home directory | Run this to return to your starting point. |
pwd | Print Working Directory | Displays the full path of your current directory location. | Run this to confirm your current location. |
ls | List | Displays all files and folders in the current directory | Run this to see what is exists. |
ls -la | List (all, detailed) | Displays all files including hidden files with detailed information. | Run this when ls doesn’t show what you are looking for. |
mkdir < name> | Make Directory | Create a new folder with specified name. | Run this to organize files into a new directory before adding content. |
rm <file> | Remove | deletes the specified file permanently. | Careful. No trash bin. Deleted files cannot be recover. |
rmdir <folder> | Remove Directory | Deletes the specifed directory. | Only works if the directory is empty. |
rm -r <folder> | Remove (Recursive) | Deletes everything recursively. | No trash bin. |
cp <source> <destination> | Copy | Copies a file to the specified destination. | Run this to duplicate file before editing as a backup. |
mv <source> <destination> | Move | Moves file or folder to the specified destination. | Also run this to rename a file bt chnaging the destination name. |
code . | — | Opens current directory on VS Code. | Run this to launch VS Code directly from the terminal without navigating manually. |
clear/cls/ctrl+L | Clear Screen | Clears all previous commands from the terminal window. | Run this to reduce visual clutter. Your command history would mot be deleted. |
exit | — | Closes the terminal session. | — |
Git—Version Control System (VCS)
Git is a version control system that tracks the history of changes made to files or a set of files within a directory. It runs locally on your computer through the command line.
GitHub
GitHub is a cloud-based platform where you can create, store, share, and manage code files. It facilitates collaboration on projects with other contributors.
Github Integration
GitHub stores Git repositories online. Without Git, GitHub has nothing to store. You interact with GitHub repositories using Git commands. GitHub uses Git as its version control system.
| Basic Concepts | Description |
|---|---|
| Branch | Separate workspace that won’t affect the main code |
| Commit | Checkpoint that saves your changes |
| Staging Area: | Waiting area before you save (commit) your changes |
| Repository | A folder that Git tracks |
| Remote | Repository hosted online (GitHub) |
| Local | Repository on your computer |
| Origin | Nickname for GitHub repository |
| Command | Action | Additional Information |
|---|---|---|
git init | initializes a new git repository and begins tracking changes. | Run this once in a new project to start version control. |
git clone | Copies a remote GitHub repository to your local computer. | Run this when setting up a project on a new machine or contributing to an existing repository. |
git status | Displays modified files and currently staged changes. | Run this frequently to stay aware of what has changed before staging or committing. |
git add <file> | Stages a specific file for the next commit. | Example: git add filename.md |
git add . | Stages all changes in the current directory. | Run this when you are ready to commit all modified files at once. |
git commit -m "<commit message>" | Saves staged changes with a descriptive commit message. | Write a clear, specific message that describes what changed and why. |
git push | Pushes local commits to the remote repository on GitHub. | Run this after the first push has established the upstream branch. |
git push origin main | Push the local main branch to main branch origin on the remote. | Use this for your first push or when you need to specify the target branch explicitly. |
git pull | Downloads and merges changes from the remote repository into your local branch. | Run this before starting any new work to ensure your local copy is up to date. |
git branch | Lists all branches in the repository. | Run this to confirm which branch you are currently on before making changes. |
git log | Displays the full commit history. | Use this to review what changed, who made the change, and when it was committed. |
For more detailed information, you may visit the resources below:
And for best practice:
2026
Endpoint untuk membuat rekam medis pasien setelah kunjungan.
| Method | Post |
|---|---|
| Endpoint | /api/emr/medical-records |
| Authorization | Bearer Token (JWT)—Role: Doctor |
| Deskripsi | Endpoint untuk membuat rekam medis pasien setelah kunjungan. |
WARNING
Limited Access — Doctor only
Hanya pengguna dengan role doctor yang dapat memanggil endpoint ini.
POST /api/emr/medical-records
Host: api.example.com
User-Agent: Mozilla/5.0 (Windows NT 10.0; Win64; x64)
Authorization: Bearer eyJhbGciOiJSUzI1NiIsInR5cCI6IkpXVCJ9...
Content-Type:application/json{
"patient_id": "PAT-001",
"visit_id": "VIS-001",
"doctor_id": "DOC-001",
"subjective": "pasien mengeluh sakit kepala sejak 2 hari lalu. Tdak ada demam",
"objective": "Tekanan darah 120/80, suhu 36.5°C",
"assessment": "Tension headache",
"plan": "Istirahat dan paracetamol 500mg",
"diagnosis_codes": ["G44.2"],
"is_final": false
}HTTP/1.1 201 Created
Content-Type: application/json
{
"status": "success",
"data": {
"record_id": "REC-20260310-001",
"patient_id": "PAT-001",
"visit_id": "VIS-001",
"doctor_id": "DOC-001",
"is_final": false,
"status": "draft",
"created_at": "2026-03-10T10:30:20Z",
"audit_id": "AUD-20240915-3309",
},
"request_id": "req-7f3a9c12"
}400 Bad Request
{
    "status": "error",
    "error_code": "EMR-4001",
    "http_status": 400,
    "message": "Request body tidak valid.",
    "detail": {
      "field": "visit_id",
      "issue": "visit_id VIS-20240915-0099 tidak ditemukan atau sudah memiliki rekam medis."
      },
    "request_id": "req-7f3a9c12"
}
403 Forbidden
{
    "status": "error",
    "error_code": "EMR-4030",
    "http_status": 403,
    "message": "Akses ditolak. Hanya dokter yang dapat membuat rekam medis.",
    "request_id": "req-7f3a9c12"
}| Name | Data Type | Required/optional | Description |
|---|---|---|---|
| patient_id | string | required | Nomor id pasien yang terdaftar sistem dan aktif. |
| visit_id | string | required | id kunjungan. Kunjungan yang belum memiliki rekam medis. |
| doctor_id | string | required | id dokter. Harus cocok dengan identitas dokter dalam JWT token yang digunakan. |
| subjective | string | required | Keluhan utama pasien. |
| objective | string | required | Hasil pemeriksaan oleh dokter seperti tanda vital dan hasil lab. |
| assessment | string | required | Interpretasi klinis dokter berdasarkan data subjektif dan objektif. |
| plan | string | required | Rencana tindak lanjut pengobatan oleh dokter. |
| diagnosis_codes | array of string | optional | Kode diagnosis pasien. Maks. 10 kode |
| is_final | boolean | optional (default: false) | default: false. Jika true, rekam medis tidak bisa diubah. |
Compliance Note
IMPORTANT
Data yang diinput melalui endpoint ini diakui sebagai Rekam Medis Elektronik (RME) resmi yang wajib memenuhi standar keamanan, kerahasiaan, dan akurasi sesuai Permenkes No. 24 Tahun 2022, serta terintegrasi dengan platform SATUSEHAT Kemenkes.
Pastikan field subjective, objective, assessment, dan plan diisi dengan informasi klinis yang akurat.
Audit
NOTE
Setiap pemanggilan endpoint baik berhasil maupun gagal menghasilkan entri audit log yang immutable—tidak dapat dihapus oleh siapapun termasuk admin.
Data Locking
CAUTION
Rekam medis dengan is_final = true bersifat immutable—tidak dapat diubah oleh siapapun termasuk admin. Jika dokter perlu melakukan koreksi setelah finalisasi, prosedur addendum harus digunakan melalui endpoint terpisah, bukan modifikasi langsung.
February 23, 2026
Structured FAQ documentation for CourseCorrect covering general questions, account access, features, pricing, privacy, and technical support.
Understand CourseCorrect by the topic below.
An AI-powered platform that helps you discover the best online courses from multiple providers (Coursera, Udemy, edX, etc.).
It matches the courses with your:
✔ Career goals
✔ Skill level
✔ Learning preferences
Plus, it provides career insights (job roles, salaries) and AI recommendations via Cora.
CourseCorrect works through three main components:
CourseCorrect is designed for anyone looking to advance their skills and career through online learning:
✔ Career Changers---Find skills needed for new roles.
✔ Professionals---Upskill for promotions or industry shifts.
✔ Students and Lifelong Learners---Supplement education or explore interests.
✔ Busy Learners---Save time with AI-curated courses.
AI-powered recommendations: Cora tailors suggestions to your goals.
Simply sign in using your existing business account credentials. CourseCorrects uses secure enterprise authentication, so there’s no additional password to remember.
Your Email address on CourseCorrect is linked to your business account. To change your email address, you’ll need to update it through your business account provider’s settings. The change will automatically reflect in your CourseCorrect account the next time you log in.
Currently, there is no self-service account deletion option available. However, you can log out of your CourseCorrect account at any time using the log out button. If you need your account permanently removed, please contact our support team for assistance with account deletion.
Cora AI delvier relevant suggestions by analyzing:
*Note: The more specific information you provide to Cora AI about your goals and background, the more accurate and personalized your recommendations become.
You can ask Cora AI to compare courses you’re interested in. It will provide your options’ pros and cons, helping you make informed decisions based on your goals and learning needs.
*Note: Make sure your prompt and command is detail as possible
Yes! You can explore multiple career paths by:
No. CourseCorrect is a course discovery platform that:
Yes! CourseCorrect authenticates all course reviews to ensure genuine insights from real learners. It’s provide transparent, honest feedback to help you make informed learning decisions.
CourseCorrect continuously updates its course database to ensure you have access to the latest offerings from all provider platforms. New courses are added regularly as they become available from our partner providers.
CourseCorrect continuously updates its course database to ensure you have access to the latest offerings from all provider platforms. New courses are added regularly as they become available from our partner providers.
CourseCorrect is completely free to use. There are no subscription fees, hidden cost, or premium tiers---all feature are available to every user at no charge.
All users have access to every feature:
CourseCorrect takes a minimal data collection approach to protect your privacy. When you log in using your business account, CourseCorrect only requests access to your name and email address. The platform focuses on helping you find courses without building detailed user profiles.
Your profile information is private and only accessible to you and CourseCorrect’s system for account authentication purposes. Your profile data is used solely for account access and platform functionality.
Since CourseCorrect only collects your name and email address for basic authentication, there are no additional privacy settings to configure. Your information is already kept private by default, so there’s minimal data that would need additional privacy controls.
CourseCorrect uses your data in very limited ways:
CourseCorrect work on all major browser including Chrome, Firefox, Safari, and Edge. For optimal performance, using the latest version of browser is recommended.
No, offline access is not available. CourseCorrect is a web-based platform that requires a stable internet connection to function. A stable boradband connection is the best experience, through basic internet speeds are sufficient for course browsing and AI interaction.
If you encounter any technical issue while using CourseCorrect, you can contact through the official channels. Email: info@coursecorrect.fyi
Absolutely! As a new platform, CourseCorrect is actively seeking user feedback and ideas to improve the user experience. Whether it’s about new features, user interface improvements, or any other ideas that could make course discovery better.
To submit feedback:
2026
Installation guide for Remnote app covering all supported ways to download and install the application.
Remnote is a lightweight note-taking application made in 2020. Remnote was functioned as knowledge management tool to help people learn, think, and collaborate.
This application is available for all major desktop and mobile platforms. The following guide are all the supported ways to download and install Remnote.
Open your browser, and visit Download RemNote.
On the Desktop App box list, find Windows then click “Download” button to get the installation file.
Open the installation file and follow the instructions.
Open Remnote app the same way you would open other application on your windows.
If you use Mac, there are 2 ways to install Remnote. Follow the instructions for the processor system you are using on your Mac.
Open your browser, and visit Download RemNote.
On the Desktop App list, find Mac: Apple Silicon then click “Download” button to get the installation file.
Open the installation file and follow the instructions.
Open Remnote app the same way you would open other application on your Mac.
Open your browser, and visit Download RemNote.
On the Desktop App list, find Mac: Intel *then click “Download” button to get the installation file.
Open the installation file and follow the instructions.
Open Remnote app the same way you would open other application on your Mac.
Open your browser, and visit Download RemNote.
On the Desktop App list, find Linux then click “Download” button to get the installation file.
Open the installation file and follow the instructions.
Open Remnote app the same way you would open other application on your Linux.
Find Remnote on your Play Store, or click this link Play Store.
Tap Install to download the application.
Open Remnote the same way as you open any other application on your Android.
You can optionally download the application for Android from the Download RemNote page.
Find Remnote on your App Store, or click this link App Store.
Tap Install to download the application.
Open Remnote the same way you would open any other application on your iOS.
You can optionally download the application for iOS from the Download RemNote page.
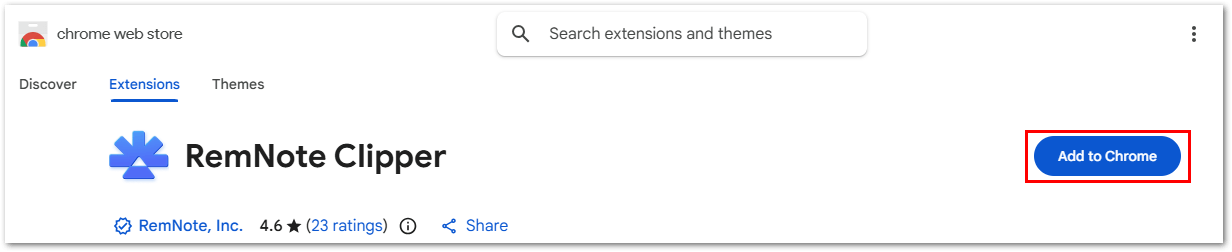
On Chrome web store, find “Remnote Clipper”, or click this link Remnote Clipper.
On the top-right corner, click Add to Chrome button.
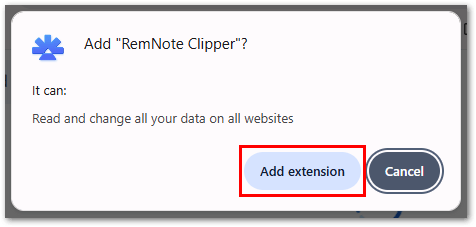
Click Add extension button on the reassurance pop up message.
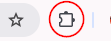
Remnote Clipper will be available at the “Extensions” icon. It is located next to address bar on your chrome browser.
Click the “Extensions” icon, then “Pin” the Remnote Clipper.
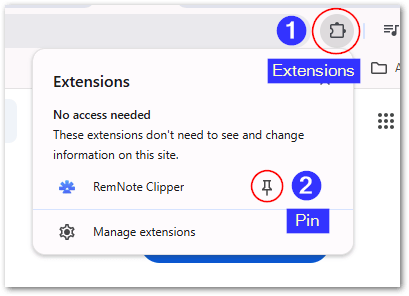
Remnote Clipper will be available between your “Extensions” icon and “Address” bar.

You can optionally download Remnote extensions at the Download RemNote page.
Thank you for visit my unofficial Remnote Installation guide. Please visit the official help center page of Remnote for more detail information.
GPA: 3.74/4.0
Central Java, ID
3rd place — English Speech Competition, 2021
National level | Research, creative writing, public speaking
Silver medal — English Competition, 2021
English grammar
Most outstanding group — English Storytelling, 2018
as Narrator, Script Writer, and Leader
4th place — English Competition, 2014
Passed 3 round selection process | English grammar
Currently Learning